Nodes
Nodes are the elements of the window which are used as the base class to create widgets and shapes. Nodes are the elements of a tree graph. Each window is a root of the tree and can have multiple nodes as children. Nodes can have children of their own.
Widgets are user control items such as text fields, buttons, comboboxes, entry fields, and listboxes.
Shapes are the geometrical formes such as markers, lines, arrows, rectangles, circles, ellipses and polygones.
Node options
Each node has 4 attributes (options):
- position
- size
- gap between objects
- direction towards the next object
The Node options are reset at the creation of a new window. They are in the format of numpy int64 arrays. The advantage of using numpy arrays is that we can do vector addition. For example the lower right corner is simply:
p1 = pos + size
The node options are stored as a dictionary inside the Window class:
class Window:
    """Create a window for the app."""
    node_options = dict(pos=np.array((20, 20)),
                        size=np.array((100, 20)),
                        gap=np.array((10, 10)),
                        dir=np.array((0, 1)),
                        )
When creating a new window, the initial node options are reassigned:
Node.options = Window.node_options.copy()
Parents and children
The window is the parent of the first-level children. At window creation an empty children list is created:
self.children = [] # children
At that point the window is the parent of the children to add. Parents are stored in a stack. Initialy the window is the parent for the first-level children. So at window creation, the window itself is added to the parent stack:
self.stack = [self] # parent stack
At that point no node exists, so the active node is set to None:
self.node = None # currently selected node
The attribute level decides the point of attachement of the new node:
- level = 0
- The last parent remains the parent and a new sibling to the last is created.
- level = 1
- The level is increased and the last child becames the new parent. The new child is a great-child of the previos parent.
- level = -1
- The level is decreased and the grand-parent becomes the new parent. The new child is a sibling to the previous parent
Enclosing nodes
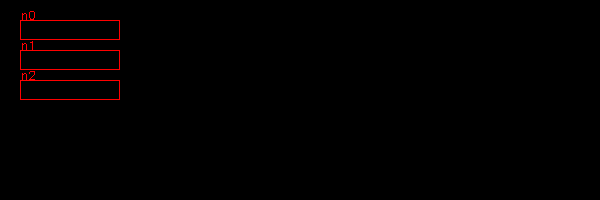
The following exemple shows a first node, folloed by 3 nodes at a child level, then 4 nodes at the parent level, with a change of direction:
class Demo(App):
    def __init__(self):
        super().__init__()

        Node()
        Node(level=1)
        Node()
        Node()
        Node(level=-1, dir=(1, 0))
        Node()
        Node()
        Node()
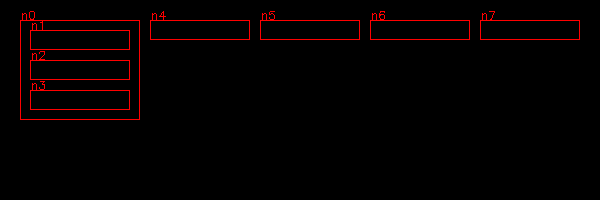
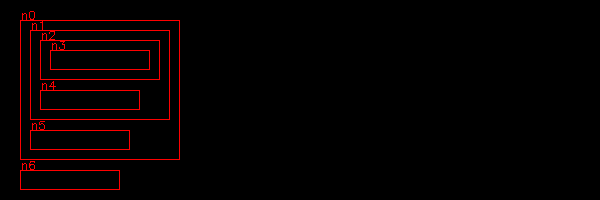
In the next example node 6 increases level again, and changes direction to vertical. The parent of the last nodes is forced to enclcose its children:
Node()
Node(level=1)
Node()
Node()
Node(level=-1, dir=(1, 0))
Node(level=1, dir=(0, 1))
Node()
Node()
Node().parent.enclose_children()
Embedded nodes
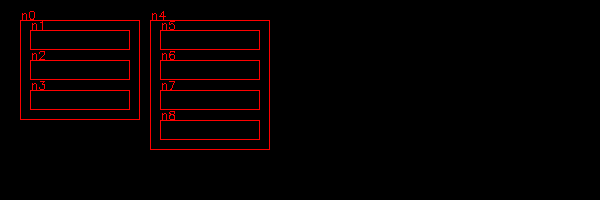
Nodes can be embedded in other nodes. In the example below node 1 is embedded in node 0, node 3 and 4 is embedded in node 2. This is the code:
Node()
Node(level=1)
Node()
Node(level=1)
Node()
Node(level=-1)
Node()
Node(level=-1)
Node()
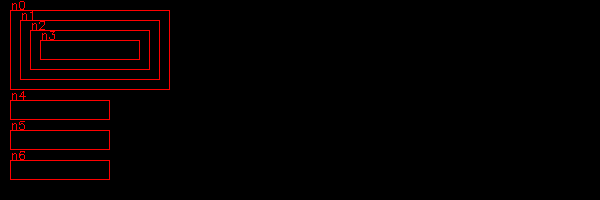
In the following example, we go down 3 levels:
- node 1 is embedded in node 0
- node 2 is embedded in node 1
- node 3 is embedded in node 2
This is the code:
Node()
Node(level=1)
Node(level=1)
Node(level=1)
Node(level=-1)
Node(level=-1)
Node(level=-1)
Decrease multiple levels
While we can go down at most one level, it is possible to go up multiple levels at once. If level is negative we repeat this:
- enclose the children of the current parent
- make the grand-parent the current parent
This is the code:
for i in range(-level):
    self.win.current_parent.enclose_children()
    self.parent = self.win.current_parent.parent
    self.win.current_parent = self.parent
Here is the previous example where we go up 3 levels at once, instead of one by one:
Node()
Node(level=1)
Node(level=1)
Node(level=1)
Node(level=-3)
Node()
Node()
Changing the direction of node placement
New nodes are placed according to the direction dir vector. This can be:
- vertical (0, 1)
- horizontal (1, 0)
- diagonal (1, 1)
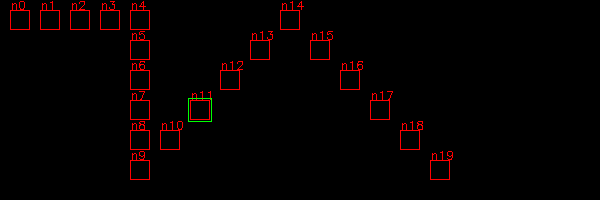
Here is an example of 5 nodes placed in vertical, horizontal and two diagonal directions:
for i in range(5):
    Node(dir=(1, 0), size=(20, 20))

for i in range(5):
    Node(dir=(0, 1))

for i in range(5):
    Node(dir=(1, -1))

for i in range(5):
    Node(dir=(1, 1))
Toggle frames
Displaying frames is mostly needed for understanging the node frame structure, and during debugging. It is convenient to turn it off or on either the window level or the node level. For this we create a new Window instance attribute:
self.frame = True
and a Node instance attribute:
self.frame = True
Inside the Node draw() method we are using both flags:
if self.win.frame and self.frame:
    cv.rectangle(self.img, (x, y, w, h), RED, 1)
    label = 'n{}'.format(self.id)
    cv.putText(self.img, label, (x, y-1), 0, 0.4, RED, 1)
Inside the Window class we define a new method to toggle the flag:
def toggle_frame(self):
    self.frame = not self.frame
Finally we add a new shortcut to the Window class:
self.shortcuts = {'\t': self.select_next_node,
                   chr(27): self.unselect_node,
                   chr(0): self.toggle_shift,
                   'f': self.toggle_frame }
Nodes based on points
We are going to create a new Node class which is defined by a list of points.
Executing commands when clicking a node
In order to react to a mouse click inside a node, we add a cmd attribute. There are several places to modify. First we add it to the default node options in the Window class:
node_options = dict(pos=np.array((20, 20)),
                      size=np.array((100, 20)),
                      ...
                      cmd=None)
Then we add a new attribute in the Node class:
self.cmd = options.get('cmd', None)
and finally we call it in the mouse callback method:
def mouse(self, event, pos, flags, param):
    if event == cv.EVENT_LBUTTONDOWN:
        self.cmd()
        for child in self.children:
            child.selected=False
            if child.is_inside(pos-self.pos):
                child.selected=True
                child.cmd()
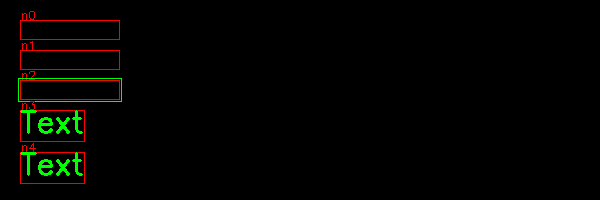
The following example we association three callback functions to three nodes:
- nodo 0 - prints the help menu
- node 1 - toggles visibility
- node 2 - creates a new Text instance
This is the code:
Node(cmd=help)
Node(cmd=App.win.toggle_visible)
Node(cmd=Text)