Creating an application
In this section we are going to create an application from zero. Our goal to establish a general framework which can be the basis for different kinds of applications, such as editors, browsers or video games.
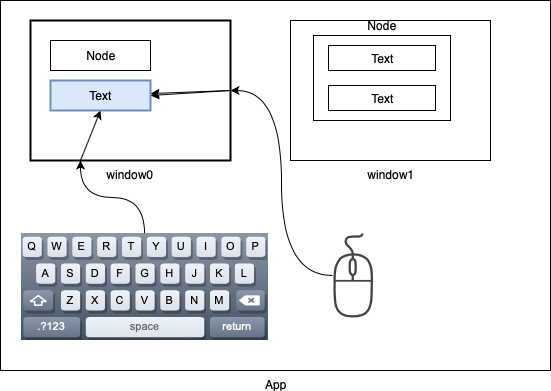
The image below shows an schematic of how an app works. The app is the overall place where keyboard and mouse input is detected. An app can open one or several windows. Only one is the active window at any given time. To make a window the active window, one has to click with the mouse in it. Each window has several objects. These objects are organized as hierarchical nodes. Each window can have one active node. The keyboard events are sent from the application to the active window, and from the active window to the active node (node, widget, or shape).
A Text node can use keyboard input to edit the widget. If there is no active node, then the window can use the keyboard input as shortcuts. If neither an active node, nor the window handles the keyboard event, it falls back to the application, which can handle it.
We start by importing the OpenCV and the numpy module and give them the usual abbreviations:
import cv2 as cv
import numpy as np
Then we declare the App class which creates a named window with
namedWindow. Without any window the waitKey function does not work:
class App:
    def __init__(self):
        cv.namedWindow('window0')
Now we need a method to run the application:
def run(self):
    key = ''
    while key != 'q':
        k = cv.waitKey(0)
        key = chr(k)
        print(k, key)

    cv.destroyAllWindows()
We wait for a key from the keyboard. The argument of the waitKey function means the
timeout period in miliseconds. A value of 0 means to wait without a time limit.
If we wanted to display the frames of a video stream every 25 miliseconds,
we could write cv.waitKey(25). If no key is pressed during this period,
a -1 integer value is returned.
Typing q quits the event loop and closes all windows.
At the end of the program we add code to instantiate the App and
to call the run() method:
if __name__ == '__main__':
    App().run()
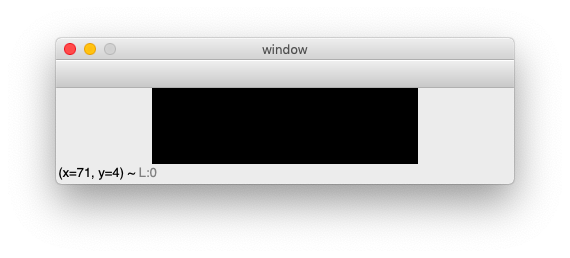
With cv.namedWindow('window0') OpenCV opens a smll black image such
as shown below.
On a Mac the some of the key presses do not give a result and some of the keys have a code value of 0. These keys have:
- no key code: cmd, fn, Up, Down, Left, Right
- key code 0: alt, ctrl, shift
All letters are lower-case only. We will see later how we can use the code 0 of the alt/ctrl/shift key to toggle between lower case and upper case letters.
Shortcut keys
It is convienent for an application to have shortcut keys. The most efficient way to define to associate certain keys with a function is to use a dictionary. In the App class init function we add:
self.shortcuts = {  'h': help,
                    'i': self.inspect,}
This dictionary associates the letter h with the function help() and the letter
i with the function self.inspect(). Later we will add more shortcut functions.
In the App class we define the key handler:
- def key(self, k):
- if k in self.shortcuts:
- self.shortcuts[k]()
The function help is defined as a global function:
def help():
    print('--- HELP ---')
The function inspect is defined as a method of the App class:
def inspect(self):
    print('--- INSPECT ---')
    print('App.wins', App.wins)
    print('App.win', App.win)
This kind of inspect function is usefull for debugging.
Create the Window class
Some applications have only one window, but often an appliation can
have any number of windows. To track all the windows of an application and specify the
currently active window, we add these two class variables to the App`
class:
class App:
    wins = []
    win = None
App.wins is the list of opended windows. App.win is the currently active window.
The Window class is defined below:
class Window:
    """Create a window."""
    def __init__(self, win=None, img=None):
First, the new window is added to the Apps window list. Then it is made the currently active window:
App.wins.append(self)
App.win = self
Then the windows object list self.objs is set to the empty list.
Currently there is now active object, so currently active object self.obj it’s set to None:
self.objs = []
self.obj = None
If no image is given, the constructer creates a 200 x 600 pixel default image with all pixels being black:
if img==None:
    img = np.zeros((200, 600, 3), np.uint8)
If no window name is given, a new string is formed from the window id. Afterwards the id is incremented to the next higher value:
if win == None:
    win = 'window' + str(App.win_id)
App.win_id += 1
The window name and the image are stored as an instance attribute:
self.win = win
self.img = img>
As the window is directly modified by adding graphics objects to it, we need to keep a copy of the original image:
self.img0 = img.copy()
Finally we show the image:
cv.imshow(win, img)
Handle the mouse
The mouse is handled separately by each window.
We set a mouse callback function to the window’s mouse handler function:
cv.setMouseCallback(win, self.mouse)
Inside the Window class we define a mouse function which receives the parameters:
eventy type (mouse down, up, double-click, move)
postion (x, y)
flags (3 mouse bottons, 3 modifier keys)
- def mouse(self, event, x, y, flags, param):
text = ‘mouse event {} at ({}, {}) with flags {}’.format(event, x, y, flags) cv.displayStatusBar(self.win, text, 1000)
We display these parameters for 1 second in the status bar.
Inside the mouse callback function, we dispatch the events, according to
the event type. There are 12 different types of mouse events:
EVENT_LBUTTONDBLCLK 7
EVENT_LBUTTONDOWN 1
EVENT_LBUTTONUP 4
EVENT_MBUTTONDBLCLK 9
EVENT_MBUTTONDOWN 3
EVENT_MBUTTONUP 6
EVENT_MOUSEHWHEEL 11
EVENT_MOUSEMOVE 0
EVENT_MOUSEWHEEL 10
EVENT_RBUTTONDBLCLK 8
EVENT_RBUTTONDOWN 2
EVENT_RBUTTONUP 5
There are 3 buttons:
- left (LBUTTON)
- middle (MBUTTON)
- right (RBUTTON)
and there are 3 event types:
- down (DOWN)
- up (UP)
- doubleclick (DBLCLK)
Furthermore there are 6 event flags which can be combined together. For exemple, pressing the left button and the ctrl key simultaneously would result in 9, the sum of 1+8:
EVENT_FLAG_LBUTTON 1
EVENT_FLAG_MBUTTON 4
EVENT_FLAG_RBUTTON 2

EVENT_FLAG_CTRLKEY 8
EVENT_FLAG_SHIFTKEY 16
EVENT_FLAG_ALTKEY 32
When a mouse is clicked in a window, this window becomes the active window and this must be signalled to the App:
if event == cv.EVENT_LBUTTONDOWN:
    App.win = self
Create the Object class
An app can have multiple windows, and each window can have multiple objects. Only one object is the active object in any one window. We add this code to the constructor of the Window class:
self.objs = []
self.obj = None
Initially the object list is empty, and there is no active object yet.
Now we can create the Object class:
class Object:
    """Add an object to the current window."""
    def __init__(self, **options):
        App.win.objs.append(self)
        App.win.obj = self
        self.img = App.win.img
We append the new object to the object list of the currently active window. We go through two levels: the app knows the currently active window, and the currently active window keeps track of its objects.
The expression App.win.obj means the currently active object of
the currently active window. There is always an active window, which is also the
top window. The window which had been clicked last, becomes the active window.
Finally we set the windows image as the target for the object.
To specify the default options for a new object we use a dictionary:
- default position (pos)
- default size (size)
- inital id
This default dictionary defined as a Window class attribute, and is the same for all windows:
obj_options = dict(pos=(20, 20), size=(100, 30), id=0)
The current object obtions are defined as Window instance attribute and is independent for each window. We must be careful to copy the dictionary, and not just make a reference to it:
self.obj_options = Window.obj_options.copy()
Inside the Object constructor we update the object options with the new options received as argument:
d = App.win.obj_options
d.update(options)
Then we assign the id, position and size of the object:
self.id = d['id']
self.pos = x, y = d['pos']
self.size = w, h = d['size']
Then we increment the object id:
d['id'] += 1
Often objects (buttons, text) are placed in a vertical layout, with a small gap, we calculate a new position for the next object automatically:
d['pos'] = x, y + h + 5
In order name the object, we give define the str method:
def __str__(self):
    return 'Object {} at ({}, {})'.format(self.nbr, *self.pos)
Drawing an object
Each object knows how to draw itself. At this point we need to define some colors at the beginning of the program. Remember that OpenCV uses the BGR color format:
BLACK = (0, 0, 0)
RED = (0, 0, 255)
GREEN = (0, 255, 0)
BLUE = (255, 0, 0)
WHITE = (255, 255, 255)
In the Object class we add a draw method which draws the object by placing a thin rectangle on the image to mark the region occupied by the object:
def draw(self):
    cv.rectangle(self.img, (*self.pos, *self.size), RED, 1)
In the Window class add a draw method which draws all the objects. First we restore the image from the stored original image. Then we draw all the objects and finally we show the updated image:
def draw(self):
    self.img[:] = self.img0[:]

    for obj in self.objs:
        obj.draw()

    cv.imshow(self.win, self.img)
At this point, we can redraw the window, whenever there is a mouse event.
So we add this as the last line in the mouse handler:
self.draw()
Adding new windows and new objects
The constructors of the Window and the Object class both have default parameters. This allows us to add shortcuts to automatically create new windows and new objects:
self.shortcuts = {  'h': help,
                    'i': self.inspect,
                    'w': Window,
                    'o': Object,}
Passing the mouse click to an object
When a mouse click happens inside an object, this should be handled by that object. Therefore we need to know if the mouseclick happend inside the object:
def is_inside(self, x, y):
    x0, y0 = self.pos
    w, h = self.pos
    return x0 <= x <= x0+w and y0 <= y <= y0+h
Inside the Window mouse method we add this code:
if event == cv.EVENT_LBUTTONDOWN:
    App.win = self

    self.obj = None
    for obj in self.objs:
        obj.selected = False
        if obj.is_inside(x, y):
            obj.selected = True
            self.obj = obj
Select an object
In order to act on an object we need to select it. This can be done by clicking with the mouse on the object. At the creation of a new object it is not selected:
self.selected = False
We draw the selected object with a colored contour. This is the modiefied draw method:
def draw(self):
    x, y = self.pos
    w, h = self.size
    cv.rectangle(self.img, (x, y, w, h), WHITE, 1)
    if self.selected:
        cv.rectangle(self.img, (x-2, y-2, w+2, h+2), RED, 2)
Moving an object
If the mouse is clicked over an object, the name of the object is printed:
def mouse(self, event, x, y, flags, param):
    if event == cv.EVENT_LBUTTONDOWN:
        print(self)
The moving of an object has to be defined in the Window mouse handler and not in the Object mouse handler. Depending on the direction we move the object, the mouse coordinates can be outside the object.
If the mouse moves and the ALT key is pressed, the current object is moved to the cursor position (x, y):
if event == cv.EVENT_MOUSEMOVE:
    if flags == cv.EVENT_FLAG_ALTKEY:
        self.obj.pos = x, y
Add window custom options
To make our application as customizable as possible, we should give all parameters such as the window background color, the default object color, the selection color as options to the app class.
In the App class we add this line:
options = dict( win_color=GRAY, obj_color=YELLOW, sel_color=BLUE)
In the Window init method we add this:
if img == None:
    img = np.zeros((200, 600, 3), np.uint8)
    img[:,:] = App.options['win_color']
We update the Object draw method to this:
cv.rectangle(self.img, (x, y, w, h), App.options['obj_color'], 1)
if self.selected:
    cv.rectangle(self.img, (x-2, y-2, w+2, h+2), App.options['sel_color'], 2)
Displaying information in the status bar
The status bar is a convenient place to display feedback information during program development.
Compared to printing to the console the statusbar has a double advantage:
- the info appears in the associated window
- the info disappears after a timeout
This code is added to the key handler in the Window class:
text = 'key {} ({})'.format(k, ord(k))
cv.displayStatusBar(self.win, text, 1000)
This code is added to the mouse handler in the Window class:
def mouse(self, event, x, y, flags, param):
     text = 'mouse event {} at ({}, {}) with flags {}'.format(event, x, y, flags)
     cv.displayStatusBar(self.win, text, 1000)
Create the Text class
In order to add text to an object, we subclass the Object class and we add the text options as a class attribute:
class Text(Object):
    """Add a text object to the current window."""
    options = dict( fontFace=cv.FONT_HERSHEY_SIMPLEX,
                    fontScale=1,
                    color=BLUE,
                    thickness=1,
                    lineType=cv.LINE_8, )
In the constructor method we update the options, copy them to the Text object, then we call the parent (Object class) constructor:
def __init__(self, text='Text', **options):

    for k, v in options.items():
        if k in Text.options:
            Text.options[k] = v
Send key events to windows and objects
In order to send key events to a specfic object, we must first send the key event from the app level to the currently active window by modifying the App event loop like this:
def run(self):
    while True:
        key = cv.waitKey(0)

        if key >= 0:
            k = chr(key)
            if not App.win.key(k):
                self.key(k)
We first the key event to the Window level by calling App.win.key handler.
If the upper level handles the event, it is returning True. In that case
the App level has does not need to call its own key handler.
On the app level the letters w, o, t, i, h have associated shortcuts. However, when an object is active for editing, the key press has to go to the active object, and should not be treated as a shortcut.
In the Window class we add a key event handler which
treats certain keys as special:
- the TAB key to advance to the next object
- the ESCAPE key to unselect the current object
- the CMD/SHFT key to toggle upper and lower case
Again we use a dictionary to associate the keys with their respective actions:
self.shortcuts = {  '\t': self.select_next_obj,
                    chr(27): self.unselect_obj,
                    chr(0): self.toggle_case, }
At the window level we first see if the key is part of the shortcut keys. If this
is the case, the associated function is called, the image redrawn, and the key
handler returns True, to signal to the caller that the event has been dealed with:
def key(self, k):
    if k in self.shortcuts:
        self.shortcuts[k]()
        self.draw()
        return True

    elif self.obj != None:
        self.obj.key(k)
        self.draw()
        return True

    return False
If the key is not a shortcut key and if there exists an active object, the key is sent the key(k) handler at the Object level. There the key events are used for editing the text attribute.
Use the tab key to advance to the next object
It is convenient to use the tab key to move between objects.
The following function tries to find the index of the currently
selected object, if there is one, and increments it by one:
def select_next_obj(self):
    """Select the next object, or the first in none is selected."""
    try:
        i = self.objs.index(self.obj)
    except ValueError:
        i = -1
    self.objs[i].selected = False
    i = (i+1) % len(self.objs)
    self.objs[i].selected = True
    self.obj = self.objs[i]
Use the escape key to unselect
The escape key can serve to unselect an object. We add the following code to the Window class:
def unselect_obj(self):
    if self.obj != None:
        self.obj.selected = False
        self.obj = None
Toggle between upper case and lower case
The OpenCV module does not allow to get upper-case letters.
To be able to input upper case letters we use the keys which result
in a key code of 0 to switch between upper case and lower case.
To implement this we add the following code to the Window key handler:
elif k == chr(0):  # alt, ctrl, shift
    self.upper = not self.upper
    if self.upper:
        cv.displayStatusBar(self.win, 'UPPER case', 1000)
    else:
        cv.displayStatusBar(self.win, 'LOWER case', 1000)
    return True
Update size of the text object
When text is edited, the size of the object changes. We use this function to get the new size:
def get_size(self):
    """Returns the text size and baseline under the forme (w, h), b."""
    d = self.text_options
    return cv.getTextSize(self.text, d['fontFace'], d['fontScale'],d['thickness'])
Creating the Node class
To place geometric elements into the window we are creating a Node class which has the following attributes:
- position (top left corner)
- size
- direction of the next object
- gap between adjacent objects
We store the default options as Node class attribute:
class Node:
    options = dict( pos=np.array((20, 20)),
                    size=np.array((100, 40)),
                    gap=np.array((10, 10)),
                    dir=np.array((0, 1)),
                    )
In the Node constructor, we can change these 4 options by specifing
a named parameter. If the parameter is given in the form of a tuple,
such as size=(50, 20) the tuple needs to be transformed into an
np.array. Only the 4 elements of the options dictionary are updated:
def __init__(self, parent, **options):

    # update node options from constructor options
    for k, v in options.items():
        if k in Node.options:
            if isinstance(v, tuple):
                v = np.array(v)
            Node.options[k] = v
Then we create empty instance attributes:
# create instance attributes
 self.pos = None
 self.size = None
 self.gap = None
 self.dir = None
We give them values from the node optionss:
# update instance attributes from node options
self.__dict__.update(Node.options)
Finally we calculate the next node position:
pos = self.pos + (self.size+self.gap)*self.dir
Node.options['pos'] = pos
Drawing the node
Nodes need to be drawn recursively. If a node has chidren,
these need to be drawn as well. The draw method needs a position
argument to draw the children with respect to the parent position.
The default position is (0, 0). If the node is selected, a selection
rectangle is drawn around it:
def draw(self, pos=np.array((0, 0))):
    x, y = pos + self.pos
    w, h =  self.size
    cv.rectangle(self.img, (x, y, w, h), RED, 1)
    if self.selected:
        cv.rectangle(self.img, (x-2, y-2, w+4, h+4), GREEN, 1)

    for child in self.children:
        child.draw(self.pos)
Checking if a position is inside
Using the numpy library makes 2D calculation easy. We can compare
the components of a vector at once, such as self.pos < pos, which
results in a boolean vector of the form [True False]. The function
all() returns True if all vector components are True:
def is_inside(self, pos):
    """Check if the point (x, y) is inside the object."""
    pos = np.array(pos)
    return all(self.pos < pos) and all(pos < self.pos+self.size)
Finde the enclosure for children
If several nodes are placed inside another node, at the end the size of
the parent nodes needs to be adapted to enclose all children. Here
the np.maximum function finds the maximum coordinates of two vectors:
def enclose_children(self):
    p = np.array((0, 0))
    for node in self.children:
        p = np.maximum(p, node.pos+node.size)
    self.size = p