Introduction
In this section we look at the basic operations for displaying images in a window and reacting to mouse and keyboard events.
Load and show an image
OpenCV is a library for image processing. We start this tutorial by opening a file and displaying it in a window.
First we import the OpenCV library cv2 and give it the shortcut cv.
import cv2 as cv
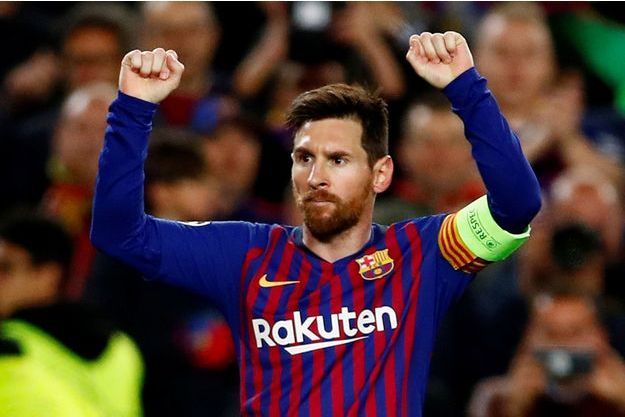
Then we load an image from the current folder with the function cv.imread
and display it with the function cv.imshow in a window called window.
img = cv.imread('messi.jpg')
cv.imshow('window', img)
You can download the image here:
Without calling the cv.waitKey() no window is displayed. The parameter of this function is the number of
miliseconds the function waits for a keypress. With a value of 0 the function waits indefinitely.
Once a key is pressed, the program advances to the last line and destroys all windows.
cv.waitKey(0)
cv.destroyAllWindows()
Clicking the window close button closes the window, but does not quit the program. After closing the window, a key press has no effect anymore and the only way to quit the program is by choosing Quit from the (Python) menu, or by pressing the shortcut cmd+Q.
import cv2 as cv

img = cv.imread('messi.jpg')
cv.imshow('window', img)

cv.waitKey(0)
cv.destroyAllWindows()
What’s a pixel?
Images are made of pixels. They are the colored dots that compose an image. If you zoom into an image you can see squares of uniform color. Use the mouse wheel and try to zoom into an OpenCV image.
It shows also the RGB color values at the mouse position (currently at R=41, G=29, B=95). To the left are reddish pixels, to the right are blueish pixels.

The status line shows the mouse position (currently at x=470, y=308). Move the mouse to explore the coordinate system. The origine (0, 0) is at the top left position.
- The x coordinate increases from left to right
- The y coordinate increases from top to bottom
The highest values are at the bottom right corner, which gives you the size of the image.
Save an image
Saving an image is very simple. Just use imwrite(file, img)
and supply the file name with a recognized image format extension (.jpg, .png, .tiff).
OpenCV automatically converts to the desired format.
To change the image to a grayscale image use this function:
gray = cv.cvtColor(img, cv.COLOR_BGR2GRAY)
import cv2 as cv

img = cv.imread('messi.jpg')
cv.imshow('window', img)

cv.imwrite('messi.png', img)
gray = cv.cvtColor(img, cv.COLOR_BGR2GRAY)
cv.imwrite('messi_gray.png', gray)

cv.waitKey(0)
cv.destroyAllWindows()
Capture live video
To capture video we must create a VideoCapture object.
The index 0 refers to the default camera (built-in webcam):
cap = cv.VideoCapture(0)
Inside a loop we read the video capture to get frames. We then operate on the frame (convert to grayscale), then display the result, and then loop back. The loop finishes when q is pressed:
while True:
    # Capture frame-by-frame
    ret, frame = cap.read()

    # Our operations on the frame come here
    gray = cv.cvtColor(frame, cv.COLOR_BGR2GRAY)

    # Display the resulting frame
    cv.imshow('window', frame)
    if cv.waitKey(1) & 0xFF == ord('q'):
        break
At the end the video stream is relased and all windows are closed:
# When everything done, release the capture
cap.release()
cv.destroyAllWindows()
"""Capture video from camera."""
import cv2 as cv

cap = cv.VideoCapture(0)

while True:
    # Capture frame-by-frame
    ret, frame = cap.read()

    # Our operations on the frame come here
    gray = cv.cvtColor(frame, cv.COLOR_BGR2GRAY)

    # Display the resulting frame
    cv.imshow('frame', frame)
    if cv.waitKey(1) & 0xFF == ord('q'):
        break

# When everything done, release the capture
cap.release()
cv.destroyAllWindows()
Add an overlay
An overlay can be added to a window to add a line of text during a certain time delay. This is the fonction:
cv.displayOverlay(window, text, delay=0)
The overlay text is white on black background, centered and can be displayed on multiple lines:
cv.displayOverlay('window', 'line 1\nline 2\nline 3')
# Add an overlay
import cv2 as cv

file = 'messi.jpg'
img = cv.imread(file, cv.IMREAD_COLOR)

cv.imshow('window', img)
cv.displayOverlay('window', f'file name: {file}')

cv.waitKey(0)
cv.destroyAllWindows()
The following program adds the following information:
- the file name
- the width of the image (in pixels)
- the height of the image
- the number of channels (3 for RGB)
OpenCV images are Numpy arrays:
>>>type(img)
<class ‘numpy.ndarray’>
Such an array has the attribute shape which returns the array dimensions.

# Add an overlay
import cv2 as cv

file = 'messi.jpg'
img = cv.imread(file, cv.IMREAD_COLOR)

cv.imshow('window', img)
text = f'file name: {file}\n\
        width: {img.shape[1]}\n\
        height: {img.shape[0]}\n\
        channels: {img.shape[2]}'

cv.displayOverlay('window', text)

cv.waitKey(0)
cv.destroyAllWindows()
Add a trackbar
A trackbar is a slider added at the bottom of the window.

The function takes the following arguments:
cv.createTrackbar(name, window, value, maxvalue, callback)
- the trackbar name
- the window where to add the trackbar
- the initial value
- the maximum value maxvalue on a scale starting at 0
- the callback function called if the slider is moved
The createTrackbar command adds a trackbar below the main image.
It goes from 0 to 255 and we set the initial value to 100.
When the trackbar is moved, it calls a callback function named trackbar:
cv.createTrackbar('x', 'window', 100, 255, trackbar)
The callback function trackbar displays the trackbar position in the overlay
region on getTrackbarPosof the window:
def trackbar(x):
    """Trackbar callback function."""
    text = f'Trackbar: {x}'
    cv.displayOverlay('window', text, 1000)
    cv.imshow('window', img)
The function cv.imshow is used to force an update of the window.
# Add a trackbar
import cv2 as cv

def trackbar(x):
    """Trackbar callback function."""
    text = f'Trackbar: {x}'
    cv.displayOverlay('window', text, 1000)
    cv.imshow('window', img)

img = cv.imread('messi.jpg', cv.IMREAD_COLOR)
cv.imshow('window', img)
cv.createTrackbar('x', 'window', 100, 255, trackbar)

cv.waitKey(0)
cv.destroyAllWindows()
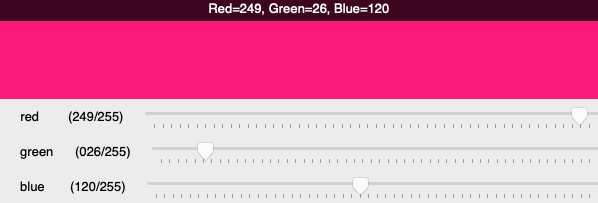
Compose an RGB color
We can use three trackbars for composing a color.
First we use the Numpy zero() function to create a black image
with a dimension of (100, 600).
img = np.zeros((100, 600, 3), 'uint8')
Inside the trackbar callback function rgb we get the 3 trackbar positions
with the red, green and blue color components which can vary from 0 to 255.
r = cv.getTrackbarPos('red','window')
g = cv.getTrackbarPos('green','window')
b = cv.getTrackbarPos('blue','window')
Then we reset the image array with the new color value. OpenCV uses the BGR order. Be careful to use the right order.
img[:] = [b, g, r]
# Compose an RGB color with 3 trackbars
import cv2 as cv
import numpy as np

def rgb(x):
    """Trackbar callback function."""
    r = cv.getTrackbarPos('red','window')
    g = cv.getTrackbarPos('green','window')
    b = cv.getTrackbarPos('blue','window')
    img[:] = [b, g, r]
    cv.displayOverlay('window', f'Red={r}, Green={g}, Blue={b}')
    cv.imshow('window', img)

img = np.zeros((100, 600, 3), 'uint8')
cv.imshow('window', img)
cv.createTrackbar('red', 'window', 200, 255, rgb)
cv.createTrackbar('green', 'window', 50, 255, rgb)
cv.createTrackbar('blue', 'window', 100, 255, rgb)
rgb(0)

cv.waitKey(0)
cv.destroyAllWindows()
Catch mouse events
The setMouseCallback function attaches a mouse callback function to the image window:
cv.setMouseCallback('window, mouse)
This is the callback definition:
def mouse(event, x, y, flags, param):
    """Mouse callback function."""
    text = f'mouse at ({x}, {y}), flags={flags}, param={param}'
    cv.displayStatusBar('window', 'Statusbar: ' + text, 1000)
"""Catch mouse events and write to statusbar."""
import cv2 as cv

def mouse(event, x, y, flags, param):
    """Mouse callback function."""
    text = f'mouse at ({x}, {y}), flags={flags}, param={param}'
    cv.displayOverlay('window', 'Overlay: ' + text, 1000)

img = cv.imread('messi.jpg')
cv.imshow('window', img)
cv.setMouseCallback('window', mouse)

cv.waitKey(0)
cv.destroyAllWindows()
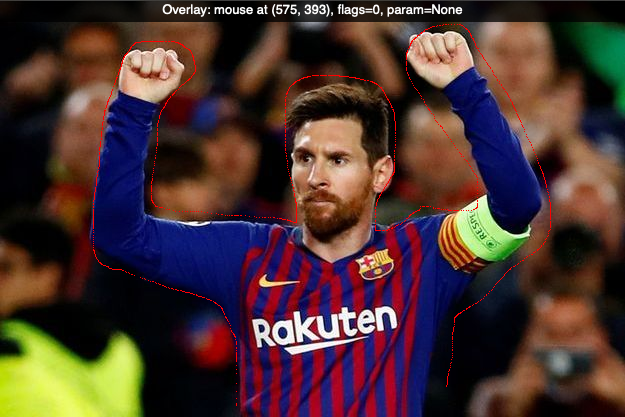
Draw with the mouse
Now we can use the mouse to change the pixel color at the mouse position.
We can make a simple drawing program. When the mouse button is pressed,
the flag is set to 1. We use an if statement to set the current pixel
at (x, y) to red when the mouse button is pressed.
if flags == 1:
    img[y, x] = [0, 0, 255]
Notice: OpenCV uses the color ordering BGR, so you must specify the red component last.
This is an image with a red outline drawn with the mouse.
"""Draw pixels with the mouse."""
import cv2 as cv

def mouse(event, x, y, flags, param):
    text = f'Mouse at ({x}, {y}), flags={flags}, param={param}'
    cv.displayOverlay('window', text, 1000)
    if flags == 1:
        img[y, x] = [0, 0, 255]
    cv.imshow('window', img)

img = cv.imread('messi.jpg')
cv.imshow('window', img)
cv.setMouseCallback('window', mouse)

cv.waitKey(0)
cv.destroyAllWindows()
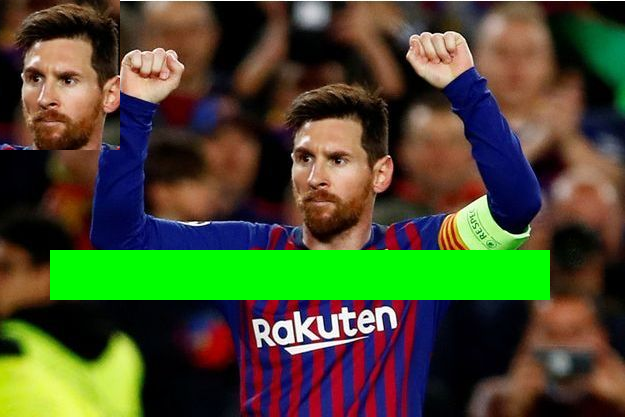
Access a slice of the image
The slice operator (:) allows to address rectangular areas of a Numpy array. The command:
img[250:300, 50:550] = (0, 255, 0)
specifies the rectangle with y values from 250 to 300 and x values from 50 to 500. It sets these pixels to green.
Next We use it to extract the area containing the face. This sub-region is then inserted elsewhere in the image.
"""Acces a slice of the image."""
import cv2 as cv
img = cv.imread('messi.jpg')

img[250:300, 50:550] = (0, 255, 0)
face = img[80:230, 270:390]
img[0:150, 0:120] = face

cv.imshow('window', img)
cv.waitKey(0)
cv.destroyAllWindows()
Object-Oriented Programming
From now on we will use object-oriented programming (OOP) techniques.
We define an App class which loads an image and creates a window.
class App:
    def __init__(self):
        img = cv.imread('messi.jpg')
        Window('image', img)

    def run(self):
        """Run the main event loop."""
        k=0
        while k != ord('q'):
            k = cv.waitKey(0)
            print(k, chr(k))

        cv.destroyAllWindows()
The run method prints the key code and the key character.
When a q is pressed the program quits.
The Window class stores window name and image and shows the image in a window.
class Window:
    """Create a window with an image."""
    def __init__(self, win, img):
        self.win = win
        self.img = img
        cv.imshow(win, img)
The last two lines instantiate the app with App() and call the run() method:
if __name__ == '__main__':
    App().run()
Patterns
These are the patterns for reading, displaying and saving images:
img = cv.imread('file', type)
cv.imshow('win', img)
cv.imwrite('file', img)
Interface:
cv.namedWindow('win', type)
cv.waitKey(ms)
cv.destroyAllWindows()
Video capture:
cap = cv.VideoCapture(0)
cap.isOpened()
cap.get(id)
cap.set(id, val)
ret, frame = cap.read()
cap.release()

img2 = cv.cvtColor(img, type)
Drawing functions:
cv.line(img, p0, p1, col, d)
cv.circle(img, c0, r, col, d)
cv.ellipse(img, p0, (w, h), a
cv.polylines(img, [pts], True, col)

font = cv.FONT_
cv.putText(img, str, pos, font, size, col)
Mouse callback:
cv.setMouseCallback('img', cb)
cb(evt, x, y, flags, param)

cv.createTrackbar('name', 'win', 0, max, cb)
cv.getTrackbarPos('name', 'win')